blue 发布的文章
source map 还原js报错
最近在做前端全链路监控,其中一个功能就是根据sdk上报的错误信息利用source map进行还原
上报信息类似这样
{
  file: '../../node_modules/downloadjs/download.js',
  message: 'Uncaught ReferenceError: data is not defined',
  line: 1,
  column: 200,
 }
包括报错信息,所在行列,然后就希望可以通过源码的source map 还原成这样子
思路是使用mozilla的source-map https://github.com/mozilla/source-map
canvas指纹生成
<script>
  const getDeviceInformation = () => {
    return {
      userAgent: navigator.userAgent,
      platform: navigator.platform,
      screenWidth: window.screen.width,
      screenHeight: window.screen.height,
    };
  };

  function sha256(hex) {
    return crypto.subtle
      .digest("SHA-256", new TextEncoder().encode(hex))
      .then((buffer) => {
        return Array.prototype.map
          .call(new Uint8Array(buffer), (x) =>
            ("00" + x.toString(16)).slice(-2)
          )
          .join("");
      });
  }

  const bin2hex = (base64) => {
    var raw = base64;
    console.log(raw);
    var hex = "";
    for (var i = 0; i < raw.length; i++) {
      var charCode = raw.charCodeAt(i).toString(16);
      hex += charCode.length === 1 ? "0" + charCode : charCode;
    }

    return hex;
  };
  const getFingerprintId = async (content, options = {}) => {
    if (!content) {
      console.error("content is empty");
      return null;
    }
    const canvas = document.createElement("canvas");
    const ctx = canvas.getContext("2d");
    // 如果不存在,则返回空值,说明不支持Canvas指纹
    if (!ctx) return null;

    const txt = content || "geekbang";
    ctx.textBaseline =
      options && options.textBaseline ? options.textBaseline : "top";
    ctx.font = options && options.font ? options.font : "14px 'Arial'";

    ctx.fillStyle =
      options && options.reactStyle ? options.reactStyle : "#f60";
    // 先画一个60x20矩形内容
    ctx.fillRect(125, 1, 60, 20);

    ctx.fillStyle =
      options && options.contentStyle ? options.contentStyle : "#069";
    // 把字填充到矩形内
    ctx.fillText(txt, 2, 15);

    const b64 = canvas.toDataURL().replace("data:image/png;base64,", "");
    const bin = atob(b64);
    const crc = bin2hex(bin.slice(-16, -12));

    const hash = await sha256(crc + JSON.stringify(getDeviceInformation()));

    document.write("<p>SHA-256 哈希值为: " + hash + "</p>");

    return hash;
  };

  window.onload = () => getFingerprintId("abc");
</script>
TypeScript 类使用完全指南
阅读Vue源码的正确姿势
调试环境搭建
1.clone vue源码, 切换到dev分支
https://github.com/vuejs/vue.git2.安装相关依赖
cd vue & npm i3.安装 rollup(rollup是一个纯代码打包工具)
npm i -g rollup4.修改script启动脚本
// vue/package.json
"dev": "rollup -w -c scripts/config.js --sourcemap --environment TARGET:web-full-dev",
5.代码运行 npm run dev然后在vue/examples/commits/index.html中引入vue.js
<script src="../../dist/vue.js"></script>下面就可以愉快的调试vue源码啦。
nginx踩坑记和一些使用总结
前两天,有一个需求,在同一域名下,通过不同的路径去访问完全独立的项目,大概就是这样
// 访问项目一
http://abc.com
//访问项目二
http://abc.com/admin
由于之前对nginx的一些匹配理解不对,花了点时间才搞定,还是要记录一下。
vue的SSR方案探讨
最近有一个项目要求SEO,于是摸索了一下vue的ssr方案,顺便总结一下。
先简单说一下ssr(Server-Side Rendering),官方是这样说的:
Vue.js 是构建客户端应用程序的框架。默认情况下,可以在浏览器中输出 Vue 组件,进行生成 DOM 和操作 DOM。然而,也可以将同一个组件渲染为服务器端的 HTML 字符串,将它们直接发送到浏览器,最后将这些静态标记"激活"为客户端上完全可交互的应用程序
其实也就是说把在客户端生成的HTML节点,改成在服务端生成
这样做的好处是,可以加快首屏的渲染(加快内容到达时间),对seo更友好。缺点是开发条件所限,需要更多的服务器端负载等,详情内容请移步官网https://ssr.vuejs.org/zh
本文总结了四种ssr方案,各有利弊
记一次http/1.1升级http/2
刚刚在知乎看到一篇分析http/3的文章,发现自己的博客还停留在http/1.1的阶段,起了折腾的心。嗯,http/1.1→http/2
关于http/2
先简单的说一下http/1.1和http/2的区别,http/2主要的是实现了多路复用,也就是说对同一个域的服务器只建立一次TCP连接,加载多个资源,使用二进制帧传输,同时会对http头部进行压缩,还有server push。
相对于http/1.1,http/2只建立一次TCP的链接,当网站资源多的时候,速度的提升越明显。这里有一个demo,可以很直观的看到两者之间加载速度的差别https://http2.akamai.com/demo
关于HTTP2.0的多路复用和HTTP1.X中的长连接复用的区别,借用一张图
模仿官方撸一个简单的vue router
事情是这样的,上次公司内部技术分享会的时候,在vue-router这一块翻车了,就想着搞清楚vue-router内部的实现方式和原理,于是就有了这篇文章
vue-router 原理
vue-router使用的路由有两种模式
1.hash模式
2.history模式
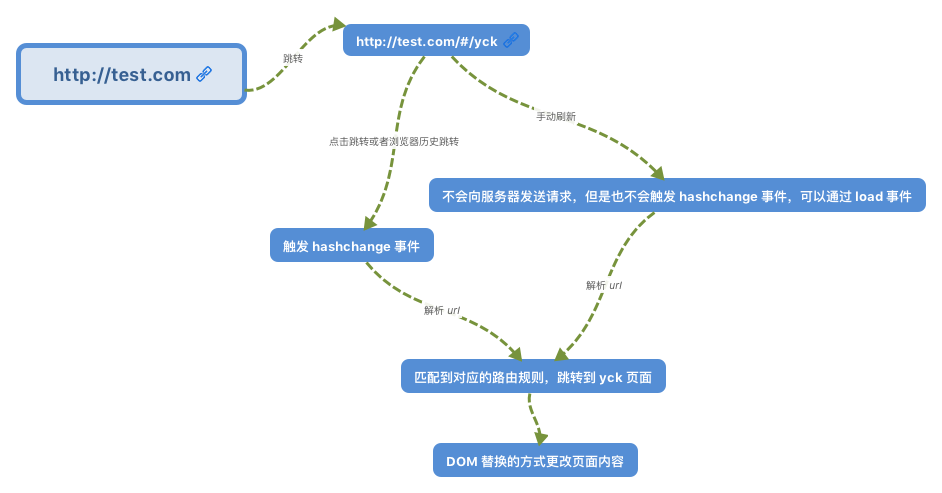
本文只简单的实现vue-router的hash模式,先看一张图
图片出自VueRouter 源码深度解析
关于JavaScript预解析的一些理解
昨天一个师弟面试遇到一道题,对于输出的结果不太理解,问我为什么是这样,题目如下
console.log(a);
var a = 1;
console.log(a);
function a() {
    console.log(2);
}
console.log(a);
var a = 3;
console.log(a);
function a() {
    console.log(4);
}
console.log(a);
上面代码运行输出的结果是

