阅读Vue源码的正确姿势
调试环境搭建
1.clone vue源码, 切换到dev分支
https://github.com/vuejs/vue.git2.安装相关依赖
cd vue & npm i3.安装 rollup(rollup是一个纯代码打包工具)
npm i -g rollup4.修改script启动脚本
// vue/package.json
"dev": "rollup -w -c scripts/config.js --sourcemap --environment TARGET:web-full-dev",
5.代码运行 npm run dev然后在vue/examples/commits/index.html中引入vue.js
<script src="../../dist/vue.js"></script>下面就可以愉快的调试vue源码啦。
如何找vue源码入口
一般调试是运行 npm run dev,所以应该在vue/package.json中找,通过script命令知道,npm run dev是启动vue/scripts/config.js这个脚本,参数为web-full-dev
  // Runtime+compiler development build (Browser)
  'web-full-dev': {
    entry: resolve('web/entry-runtime-with-compiler.js'),
    dest: resolve('dist/vue.js'),
    format: 'umd',
    env: 'development',
    alias: { he: './entity-decoder' },
    banner
  },
这是一个带编译器全版本开发版(平时线上一般都是运行经过webpack编译后的代码, 用带编译器版本方便调试理解),最终指向的入口是vue/src/platforms/web/entry-runtime-with-compiler.js 最后通过文件的引用关系可以找到定义vue构造函数是在vue/src/core/instance/index.js中
function Vue (options) {
  if (process.env.NODE_ENV !== 'production' &&
    !(this instanceof Vue)
  ) {
    warn('Vue is a constructor and should be called with the `new` keyword')
  }
  this._init(options)
}
如何阅读--new Vue过程发生什么事情
vue源码虽然说不是很庞大,但是阅读起来还是要花费一定的时间。如果毫无目的,读起来会非常费劲,甚至非常痛苦,事倍功半,直到放弃。一个成熟的开源项目,一定会有各种错综复杂的分支,通过断点调试,跟踪代码的运行流程,抓住主干,能够快速的理清一个项目的整体架构。
那么该如何阅读vue源码?先给自己提一个问题吧,new Vue过程中发生了什么事情?带着这个问题一起来读读看
通过上面的分析知道 new Vue的第一步就是执行一下vue/src/core/instance/index.js中的构造函数,构造函数只干了一件事情,就是把options传进去,调用一下init方法。
import { initMixin } from './init'
import { stateMixin } from './state'
import { renderMixin } from './render'
import { eventsMixin } from './events'
import { lifecycleMixin } from './lifecycle'
import { warn } from '../util/index'

function Vue (options) {
  if (process.env.NODE_ENV !== 'production' &&
    !(this instanceof Vue)
  ) {
    warn('Vue is a constructor and should be called with the `new` keyword')
  }
  this._init(options)
}

initMixin(Vue)
stateMixin(Vue)
eventsMixin(Vue)
lifecycleMixin(Vue)
renderMixin(Vue)

export default Vue
options是我们传进去的,也就是说其实我们平时用vue就是在写vue的一些配置
由this._init(options)知道,init方法是挂载在Vue原型下面的方法,直接在src目录下搜一下Vue.prototype._init就知道,init方法是在 vue/src/core/instance/init.js下面定义的,其实直接看上面的代码也可以很快找到init所在。
接着往下看vue/src/core/instance/init.js,init到底做了哪些事情,大概是这样
// expose real self
    vm._self = vm
    initLifecycle(vm)
    initEvents(vm)
    initRender(vm)
    callHook(vm, 'beforeCreate')
    initInjections(vm) // resolve injections before data/props
    initState(vm)
    initProvide(vm) // resolve provide after data/props
    callHook(vm, 'created')
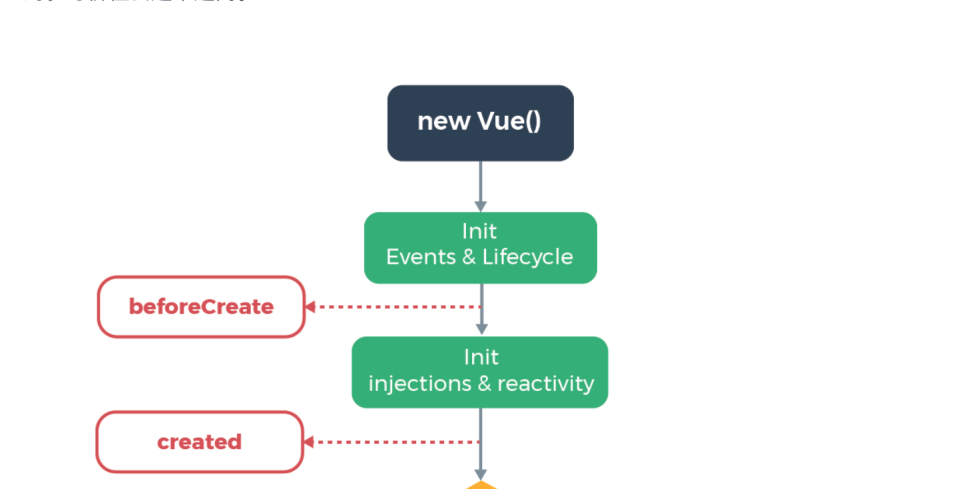
初始化生命周期,事件,渲染函数,调用beforeCreate生命周期钩子,初始化Injections,State,Provide,再到生命周期created 。是不是很熟悉?这就是vue官网上面生命周期图的一部分
next,先不要纠结每一件事情后面的实现细节,init除了上面所提到的,还有一个很重要的事情,就是mount挂载,
if (vm.$options.el) {
    vm.$mount(vm.$options.el)
  }
按照上面的思路,vm.$mount(vm.$options.el),说明$mount方法是vue原型的方法,在vue/src/platforms/web/runtime/index.js中找到。通过搜索,其实还有一个地方vue/src/platforms/web/entry-runtime-with-compiler.js, 这里是对$mount进行了一下扩展,$mount主要的功能是把生成的DOM树挂载到el上。(从上面代码知道,只有我们在new Vue的时候,传入了el挂载点,才会挂载到dom里面,所以我们如果想将来某个时间点的时候才去挂载到指定的节点下面,可以手动的调用一下$mount方法)
辣么,又有一个问题,DOM树从哪里来,哪里生成的?在vue/src/platforms/web/entry-runtime-with-compiler.js中,先看$mount的扩展部分。
// 缓存一下$mount
const mount = Vue.prototype.$mount

// 对$mount进行拓展
Vue.prototype.$mount = function (el?: string | Element, hydrating?: boolean): Component {
  el = el && query(el)

  /* istanbul ignore if */
  // 这里在开发环境下,如果挂载点是body或者documentElement的话,⚠警告
  if (el === document.body || el === document.documentElement) {
    process.env.NODE_ENV !== 'production' && warn(
      `Do not mount Vue to <html> or <body> - mount to normal elements instead.`
    )
    return this
  }

  // vue配置
  const options = this.$options
  // resolve template/el and convert to render function
  // 如果没有render函数
  if (!options.render) {
    let template = options.template
    // 看有没有template
    if (template) {
      if (typeof template === 'string') {
        //  看一下template是不是一个id
        if (template.charAt(0) === '#') {
          // 如果是,就根据id去获取innerhtml,把innerhtml作为template
          template = idToTemplate(template)
          /* istanbul ignore if */
          // 如果template为空就警告
          if (process.env.NODE_ENV !== 'production' && !template) {
            warn(
              `Template element not found or is empty: ${options.template}`,
              this
            )
          }
        }
      } else if (template.nodeType) { //如果是一个template模板就取innerHTML
        template = template.innerHTML
      } else { //template非法
        if (process.env.NODE_ENV !== 'production') {
          warn('invalid template option:' + template, this)
        }
        return this
      }
    } else if (el) { //如果传入的是一个节点,那么获取节点内容
      template = getOuterHTML(el)
    }
    if (template) {
      /* istanbul ignore if */
      if (process.env.NODE_ENV !== 'production' && config.performance && mark) {
        mark('compile')
      }
      // 这里把template转换为render函数
      const { render, staticRenderFns } = compileToFunctions(template, {
        outputSourceRange: process.env.NODE_ENV !== 'production',
        shouldDecodeNewlines,
        shouldDecodeNewlinesForHref,
        delimiters: options.delimiters,
        comments: options.comments
      }, this)
      options.render = render
      console.log('render:', render)
      options.staticRenderFns = staticRenderFns

      /* istanbul ignore if */
      if (process.env.NODE_ENV !== 'production' && config.performance && mark) {
        mark('compile end')
        measure(`vue ${this._name} compile`, 'compile', 'compile end')
      }
    }
  }
  return mount.call(this, el, hydrating)
}
上面的代码块有点长,重点关注56-62行。
扩展部分主要的工作就是,把我们写的template转化为render函数,compileToFunctions方法就是把我们传进来的template编译转换为render函数,编译这一块比较难懂先不管,只要知道编译后会返回一个render函数就好。
比如说下面的vue代码
<div id="demo">
  <div>
    <p>test {{text}}</p>
  </div>
</div>

data() {
  return {
    text: '333'
  }
}
经过编译器编译之后,生成的render函数长这样子
function anonymous() {
  with(this){return _c('div',{attrs:{"id":"demo"}},[_c('div',[_c('p',[_v("test "+_s(text))])])])}
}
里面的_c,_v,_s都是生成vnode的方法,_c生成元素节点,_v生成文本节点,_s是一个toString函数的别名,把变量的值转换为字符串,具体长这样子
function toString(val) {
  return val === null
    ? ''
    : typeof val === 'object'
      ? JSON.stringify(val, null, 2)
      : String(val)
}
$mount的扩展完成,再进入$mount的实现,在vue/src/platforms/web/runtime/index.js,
// public mount method
Vue.prototype.$mount = function (
  el?: string | Element,
  hydrating?: boolean
): Component {
  el = el && inBrowser ? query(el) : undefined
  return mountComponent(this, el, hydrating)
}
其实它也只干了一件事情,当前面的render函数生成之后,就去挂载组件mountComponent
再接着进入mountComponent,在vue/src/core/instance/lifecycle.js中。mountComponent就是去执行一下前面编译生成的render函数,生成虚拟DOM(vnode),然后调用一下_update方法
vm._update(vm._render(), hydrating)_update方法也在vue/src/core/instance/lifecycle.js中,它主要是执行了__patch__方法
if (!prevVnode) {
  // initial render
  vm.$el = vm.__patch__(vm.$el, vnode, hydrating, false /* removeOnly */)
} else {
  // updates
  vm.$el = vm.__patch__(prevVnode, vnode)
}
__patch__的实现在vue/src/core/vdom/patch.js,如果是第一次的话(一般是指页面的创建),直接把挂载的节点和当前虚拟DOM传进去更新。否则会把新旧虚拟DOM,通过pacthing算法(DOM diff算法的对比,然后将虚拟DOM更新插入到真实的DOM节点中,想知道其中细节,请阅读相关源码。
总结
最后上一张图,总结一下以上的流程
以上就是new Vue过程说所发生的事情,当然,里面还有很多地方没有提及,比如说数据响应式,事件监听,指令,模板编译等等。这里只是提供阅读Vue源码的方法,并不是解读Vue源码。通过以上的梳理,大概能理清楚Vue的整个结构流程,其中的细枝末叶可以在主流程里面逐个深入展开,这样就有了方向,再也不会不知道怎么下手。
比如说我想知道虚拟dom是什么,他是怎么生成的,dom diff是什么,然后带着问题,直接去看patch部分的源码即可
其实所有库,框架的阅读方式,也是这个流程,先理清楚每个模块实现什么功能,不要纠结某个功能的具体实现,把整个流程串起来,然后逐个击破,以上。

