模仿官方撸一个简单的vue router
事情是这样的,上次公司内部技术分享会的时候,在vue-router这一块翻车了,就想着搞清楚vue-router内部的实现方式和原理,于是就有了这篇文章
vue-router 原理
vue-router使用的路由有两种模式
1.hash模式
2.history模式
本文只简单的实现vue-router的hash模式,先看一张图
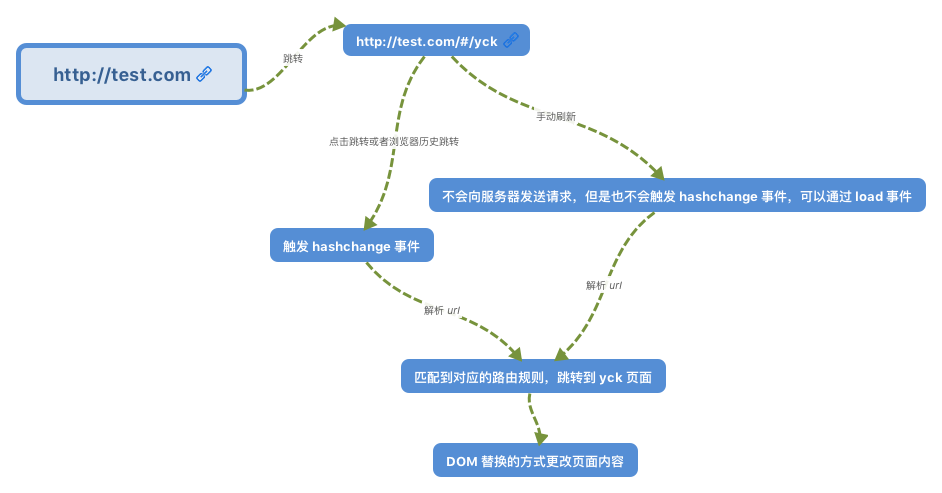
图片出自VueRouter 源码深度解析
大概意思就是,利用hashchange事件,去监听hash值的变化,然后切换到相应的组件,原理很简单。
vue-router实现
如何使用
既然是模仿,那路由的使用方式和官方是一模一样,在router文件夹里面新建一个index.js作为路由的配置
import Vue from 'vue'
import Router from '../plugins/router'

Vue.use(Router)
const HelloWorld = () => import('@/components/HelloWorld')
const About = () => import('@/components/about')

const routes = [
  {
    path: '/',
    component: HelloWorld
  },
  {
    path: '/about',
    component: About
  }
]

const router = new Router({
  // mode: 'history',
  routes
})
export default router
请自行新建路由引用的具体组件,这里引用的Router就是我们具体要实现的路由
然后在mian.js用使用路由
import Vue from 'vue'
import App from './App.vue'

Vue.config.productionTip = false

import router from './router'

new Vue({
  router,
  render: h => h(App),
}).$mount('#app')
准备工作完成。
路由实现
第一步,先导出一个路由对象
class Router {

}
export default Router
定义静态方法install
这个install是给Vue调用的,用来安装路由插件,当使用Vue.use(Router)的时候,Vue实际上调用了Router的install方法,并把vue实例通过参数传给install本身
这是vue内部的实现
export function initUse (Vue: GlobalAPI) {
  Vue.use = function (plugin: Function | Object) {
    // 判断重复安装插件
    const installedPlugins = (this._installedPlugins || (this._installedPlugins = []))
    if (installedPlugins.indexOf(plugin) > -1) {
      return this
    }
    const args = toArray(arguments, 1)
    // 插入 Vue
    args.unshift(this)
    // 一般插件都会有一个 install 函数
    // 通过该函数让插件可以使用 Vue
    if (typeof plugin.install === 'function') {
      plugin.install.apply(plugin, args)
    } else if (typeof plugin === 'function') {
      plugin.apply(null, args)
    }
    installedPlugins.push(plugin)
    return this
  }
}
在install的时候,通过mixin混合,做一些路由的init,大概这样子
static install(_Vue) {
    // 先缓存一下vue实例
    Vue = _Vue
    Vue.mixin({
      beforeCreate() {
        // 这里的options是指vue里面的options
        this.$options.router && this.$options.router.init()
      }
    })
 }
init
init做的事情比较多
1.通过绑定hashchange事件,监听hash变化
2.处理router map
3.初始化注册router-view,router-link组件
init() {
    // 监听hash
    this.bindEvents()
    // 处理路由
    this.createRouterMap()
    // 组件切换
    this.initComponent()
  }
bindEvents实现
 bindEvents() {
    window.addEventListener("hashchange", this.changeFn.bind(this), false)
    window.addEventListener("load", this.changeFn.bind(this), false)
  }
这里load的时候也做了处理,是为了解决第一次进入没有触发hashchange
 changeFn() {
    const hash = window.location.hash.slice(1) || '/'
  }
先拿到当前的hash值
处理路由表
在处理之前,先要拿到之前定义的map,之前map是通过new Router传进来的,所以,在构造函数中接收一下,并挂到options上面
constructor(options) {
    this.options = options
    this.routerMap = {}
  }
处理路由表,并把处理好的路由挂到routerMap上面,以便后面可以更好的通过hash切换组件
  createRouterMap() {
    this.options.routes.forEach(item => {
      this.routerMap[item.path] = item
    })
  }
组件注册,切换
在注册之前,先要在constructor构造函数中通过Vue本身数据双向绑定的特性,绑定一下current hash,
this.app = new Vue({
  data: {
    currentHash: '/'
    }
})
然后,这里是最关键的一步,注册router-view,router-link。
在有使用router-view的地方,把router-view替换成当前路由引用的组件
把router-link替换成a标签,并且把router-link里面的内容插入a标签里面
  initComponent() {
    Vue.component("router-view", {
      render: h => {
        const component = this.routerMap[this.app.currentHash].component
        return h(component)
      }
    })
    Vue.component("router-link", {
      props: {
        to: String
      },
      render(h) {
        // h三个参数 组件名,参数,子元素
        return h("a", {
          attrs: {
            href: "#" + this.to
            }
          },
          [this.$slots.default]
        )
      }
    })
  }
最后,当hashchange触发的时候,把当前的hash赋值给current
changeFn() {
  const hash = window.location.hash.slice(1) || '/'
  this.app.currentHash = hash
}
附上完整的代码
let Vue
class Router {
  static install(_Vue) {
    Vue = _Vue
    Vue.mixin({
      beforeCreate() {
        // 这里的options是指vue里面的options
        this.$options.router && this.$options.router.init()
      }
    })
  }

  constructor(options) {
    this.options = options
    this.routerMap = {}
    this.app = new Vue({
      data: {
        currentHash: '/'
        }
    })
  }

  init() {
    // 监听hash
    this.bindEvents()
    // 处理路由
    this.createRouterMap()
    // 组件切换
    this.initComponent()
  }

  bindEvents() {
    window.addEventListener("hashchange", this.changeFn.bind(this), false)
    window.addEventListener("load", this.changeFn.bind(this), false)
  }

  changeFn() {
    const hash = window.location.hash.slice(1) || '/'
    this.app.currentHash = hash
  }

  createRouterMap() {
    this.options.routes.forEach(item => {
      this.routerMap[item.path] = item
    })
  }

  initComponent() {
    Vue.component("router-view", {
      render: h => {
        const component = this.routerMap[this.app.currentHash].component
        return h(component)
      }
    })
    Vue.component("router-link", {
      props: {
        to: String
      },
      render(h) {
        // h三个参数 组件名,参数,子元素
        return h("a", {
          attrs: {
            href: "#" + this.to
            }
          },
          [this.$slots.default]
        )
      }
    })
  }
}

export default Router
简单完成一个通过监听hash变化切换相应组件的vue router